How to Import Masters to Tally?
The company features that were enabled while exporting the data should be enabled in the company in which the data is imported. For example, if you want to import masters created in ABC Company to a new company - XYZ Company. The options Maintain stock categories and Maintain batch-wise details must be enabled in ABC company before exporting the masters. To import masters into XYZ Company, you need to ensure that both the options Maintain stock categories and Maintain batch-wise details are enabled in XYZ Company before importing.
- Go to Gateway of Tally > Import Data > Masters.
- Enter the name of the .xml file to be imported, if the file is located in the Tally.ERP 9 application folder.

Note : By default, the export location is the Tally.ERP 9 installation folder, which is also the default import location. Therefore, it is not required to specify the file path during import. If the path is other than the installation folder, you must specify the exact location path, for example, C:\Export_Files\XML\Master.xml or C:\Export_Files\XML\DayBook.xml
- Select the behaviour to define the method by which the existing masters in the company will be treated.
Combine Opening Balances : Select this option to import data of different branches and consolidate the opening balances. You can also select this option when the opening balances of existing masters are Zero and need to be overwritten by the balances in the data being imported.
Ignore Duplicates: Select this option to import new masters along with the existing masters in Tally ignoring the duplicates.
Modify with new data: Select this option to replace the existing balances with those existing in the data imported and also override the other options available in list of behaviours available. The Import Masters screen appears as shown below:

- Press Enter to import.
Go to Accounts Info or Inventory Info to view all the masters that has been imported. You can also open the file Tally.imp located in the Tally.ERP 9 installation folder to view the import log.
How to Import Vouchers to Tally?
You can import vouchers from one company to another in Tally.ERP 9. This could be due to the following reasons:
- Importing data from third party applications.
- Migrating into a later release.
- Data corruption/loss.
- Go to Gateway of Tally > Import Data > Vouchers.
- Enter the name of the .xml file to be imported, in the Import Vouchers screen, as shown below:

Note: By default, the export location is the Tally.ERP 9 installation folder, which is also the default import location. Therefore, it is not required to specify the file path during import. If the path is other than the installation folder, you must specify the exact location path, for example, C:\Export_Files\XML\Master.xml or C:\Export_Files\XML\DayBook.xml
- Press Enter to import.
Note: You can open the file Tally.imp located in the Tally.ERP 9 installation folder to view the imported vouchers.
Configure Import/Export Feature
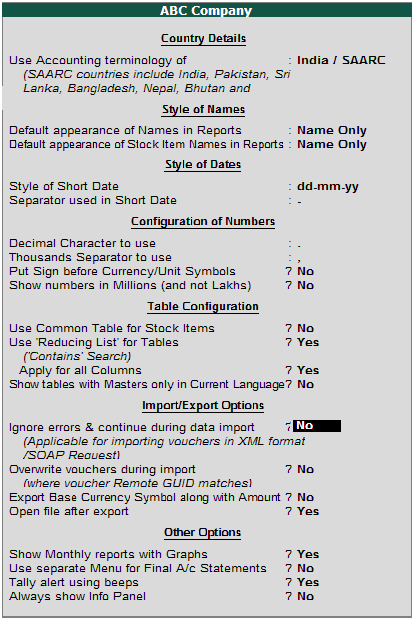
We have provided a list of configuration options. You may enable or disable these to suit your business need. To view the available configuration options,
Go to Gateway of Tally > F12: Configurations > General

- Set the option Ignore error & continue during data import to Yes if you want to ignore the errors that may occur during import. However, errors while importing data will be logged into the Tally.Imp file that is generated in the Tally.ERP 9 folder.
- If a voucher is exported and imported back to the same company, a duplicate voucher gets created on setting the option Overwrite vouchers during import to Yes . Set it to No to overwrite the duplicate vouchers. If the vouchers are exported from one company and imported in a different company then the vouchers will be overridden irrespective of the option being enabled or disabled.
- Set the option Export Base currency symbol along with amount to Yes , the base currency symbol gets exported along with the amount. On importing this voucher, it gets imported along with the Rupee symbol. If this option is set to No while exporting and when the voucher is imported in another company the voucher gets imported along with the amount prefixed/suffixed with the base currency defined in the company where it is imported.


 CAclubindia
